If you’ve ever watched epoxy peel up like a sunburn, you already know the ugly truth: moisture and epoxy don’t play nice. Concrete might look solid, but it behaves more like a sponge, pulling water from the air, the soil below, and even from tiny hairline cracks.
When you prep damp concrete the right way, you’re not just cleaning a floor. You’re building a surface that epoxy can grab onto and stay bonded to for years, not months.
This guide breaks down what “damp” really means, how to test for moisture, and what prep steps matter most before you commit to a garage epoxy coating.
Why damp concrete makes epoxy fail
Epoxy needs a clean, sound, textured surface to bond. Moisture interferes in a few common ways:
- Loss of adhesion: Water vapor pushes up through the slab and breaks the bond line.
- Blistering and bubbles: Vapor pressure forms domes under the coating.
- Cloudy spots or discoloration: Moisture can change how the coating cures.
- Efflorescence: That white, dusty salt residue can keep epoxy from sticking.
If your garage gets wet from snowmelt, humid summers, or water tracked in by tires, moisture is not a rare problem. It’s normal. The goal is to measure it, control it, and prep the slab so the coating system can handle it.
“Damp” or “wet”? A quick reality check
A little moisture on concrete isn’t always a deal-breaker. Active water is.
Here’s a simple way to think about it: epoxy can tolerate a slab that’s dry enough to meet the coating system’s limits, but it won’t tolerate a floor that’s still acting like a slow leak.
Common signs moisture is coming through the slab
| What you notice | What it can mean | What to do next |
|---|---|---|
| Dark patches that come and go | Moisture vapor or humidity cycling | Run a moisture test, improve ventilation |
| White powdery film | Efflorescence from water movement | Remove residue, test moisture, address source |
| Musty smell near the floor | Moisture and possible microbial growth | Dehumidify, check drainage, inspect cracks |
| Beads of water under a mat | Trapped moisture or condensation | Dry out space, test slab, don’t coat yet |
If the concrete is visibly wet, or water keeps returning after drying, don’t coat yet. Moisture mitigation or drainage fixes come first.
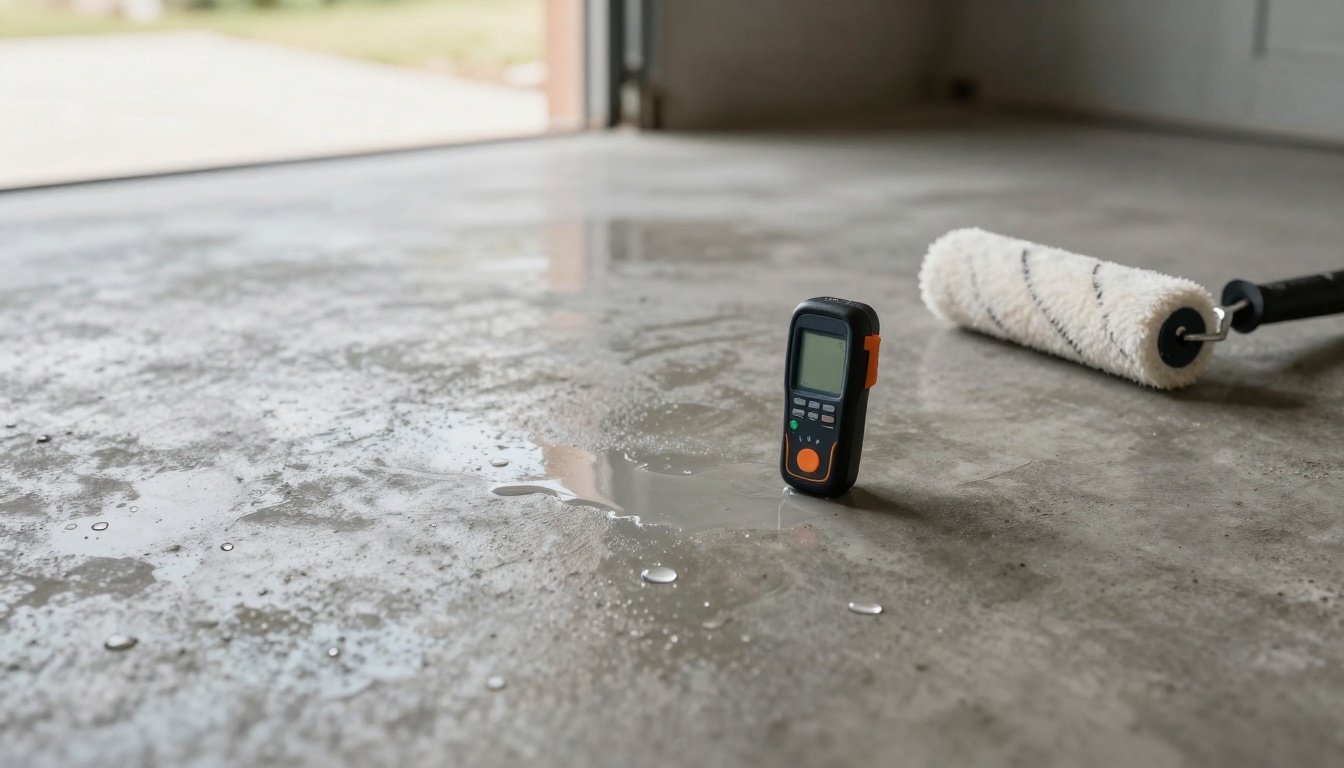
Test moisture before you start grinding
You don’t need to guess. You need data.
A good starting point is a basic plastic sheet test (tape a square of plastic to the floor and check for condensation after a day or two). It’s not a lab test, but it can quickly tell you if vapor is active.
Important: Always follow the epoxy manufacturer’s limits for moisture and curing conditions. If your readings are too high, the “prep” plan changes, because you’ll need a moisture-control system, not just cleaning and etching.
Clear the garage and set yourself up for clean prep
Right prep is messy, loud, and dusty. Plan for it.
Photo by Anete Lusina
Before you touch the slab:
- Remove everything, including shelves that trap dust near the walls.
- Protect drywall and doors from grinding dust.
- Set up airflow (fans and open doors, weather permitting).
- If humidity is high, run a dehumidifier for a day or two before prep.
Moisture problems get worse when the air is damp. Drying the space helps the slab release moisture instead of holding it.
The right way to clean damp concrete (without trapping residue)
Cleaning is not just about making the floor look better. It’s about removing bond breakers.
1) Degrease like you mean it
Oil from cars soaks into concrete and clings to pores. If you grind over oil, you can smear it deeper.
Use a concrete-safe degreaser and scrub thoroughly, then rinse and remove wastewater. Don’t leave cleaner residue behind, it can interfere with epoxy cure.
2) Remove salts and chalky buildup
If you see efflorescence (white, dusty deposits), dry brushing and vacuuming can help, but often you’ll need mechanical removal to fully eliminate it. If salts remain, epoxy may bond to the salt layer instead of the slab.
3) Let the slab dry again
After washing, give the floor time to dry with ventilation and dehumidification. A clean floor that’s still wet is not ready.
Mechanical profiling: why grinding beats acid etching for damp slabs
If moisture is part of the story, surface profile matters even more. A weak surface prep is like painting over dust and hoping for the best.
Most pro installs use diamond grinding or shot blasting to create a concrete surface profile (texture) that epoxy can lock into.
Why grinding helps when concrete is damp:
- It opens pores and removes weak top paste.
- It exposes clean concrete, not contaminated “skin.”
- It improves bond strength compared to many DIY etch-only methods.
After grinding, vacuum with a HEPA setup if possible. Fine dust left behind acts like a release agent.
Fix cracks and joints the smart way (so moisture doesn’t sneak back in)
Cracks are not just cosmetic. They’re pathways.
- Hairline cracks: Often filled with epoxy crack filler after grinding.
- Wider cracks: May need routing and filling, depending on movement.
- Control joints: Sometimes stay as joints (filled with a flexible material) instead of being rigidly patched.
If your slab has ongoing movement or settling, rigid patching can telegraph through the coating later. Moisture movement can do the same, so it’s worth choosing repair materials that match your coating system.
Moisture mitigation: when “extra prep” becomes the whole job
If testing shows high moisture vapor, you’ll likely need a moisture-mitigating primer or vapor barrier coating designed for that condition. This is where many DIY epoxy kits fall short, because they aren’t built for slabs that push moisture year-round.
A few common moisture drivers to address before coating:
Outdoor drainage: Downspouts dumping near the slab, negative grading, and clogged drains raise slab moisture.
Garage habits: Parking wet cars daily without drying time keeps humidity high.
Seasonal pressure: Winter freeze-thaw and spring rain can increase vapor movement.
Moisture mitigation products and methods vary by system, so the best move is to match the coating to your slab, not force a one-size plan.
A quick “ready to coat” checklist
Before epoxy day, you want the slab to feel boring. No damp spots, no mystery dust, no surprises.
Look for these basics:
- Concrete is clean, with no oily sheen
- Surface is profiled (not smooth like glass)
- Cracks are repaired and flush
- Dust is fully vacuumed
- Moisture test results fit the coating system’s limits
- Temperature and humidity are within the product’s allowed range
If any one of those is off, slow down. Epoxy is unforgiving when prep is rushed.
When to bring in a pro (and why it saves money)
Damp slabs are common in the Midwest, and they’re manageable, but they’re not always DIY-friendly. The hard part is not rolling epoxy. It’s diagnosing moisture and building the right prep and primer system.
If you want a floor that holds up to hot tires, road salt, and daily use, it helps to work with a team that does this every day. Broadleaf’s professional garage floor coating systems are built around proper surface prep, because that’s what makes the finish last.
And if your “garage dampness” is really a whole-home moisture pattern, it often shows up downstairs too. Broadleaf also offers epoxy flooring for basements designed for below-grade conditions where dampness is part of normal life.
Conclusion
A great epoxy floor starts long before the first coat, and moisture is the first hurdle. Test the slab, fix the causes you can, then prep damp concrete with serious cleaning, mechanical profiling, and the right repair and primer plan. Do that, and epoxy stops acting fragile and starts acting like the tough coating it’s meant to be.
If your garage floor keeps showing damp spots no matter what you do, treat it as a moisture problem first, not a paint project. Your future self will thank you every time the floor stays bonded and easy to clean.